You can use ClearVoice to organize, sort, and manage your content by Publication simply by adding the publication's URL. The ClearVoice API also allows you to "auto-publish" completed content directly to any Wordpress publication as a draft post.
How to enable auto-publishing with Wordpress:
Before you can connect your Wordpress site, you need make sure your Wordpress credentials have the correct permissions. Verify with the website administrator that you have the role of "Editor" or "Author." If you don't have one of those roles, you can ask your web administrator to update your permissions, or use another Wordpress user's credentials in ClearVoice who does have these permissions.
- Select Manage > Publications from the left menu in ClearVoice
- Select the publication you'd like to integrate with WordPress, or select Create New Publication
- If you are setting up a new Publication, enter the name, and the URL for the publication. If you are setting up an existing publication with WordPress, skip to step 4.
- Click the WordPress Auto-Publishing menu, it will expand.
- Enter your blog's hostname/URL. If your blog URL is a subdomain, enter that. (Ex: blog.subdomain.com). Many times this will be the same as the URL above. You will include everything up to the / (if there is one) here.
- If your blog URL has a path (www.clearvoice.com/blog) select Advanced Settings
- Enter the Path in the Path to xmlrpc field
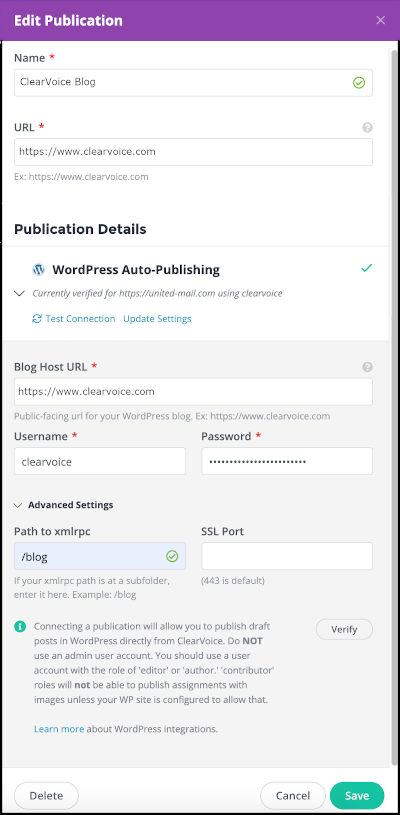
8. If you are using a different SSL port, enter that in the SSL Port field (This is uncommon; if you have questions, the IT person in your office will be able to assist.)
9. Enter your WordPress login credentials and click Verify. These should be the same credentials you use to log in to your blog to manage content.
10. Once your credentials are verified, click Save.
Voila! Now, ClearVoice assignments attached to your publication can be sent directly to your website/blog as draft posts via the Publish button within an assignment. Log in to your WordPress account and navigate to Posts to review each post before pushing it live.
Error During Verification
If you get an error when trying to verify, ensure all fields are filled out correctly. If you are still receiving an error message and all information is filled out accurately, speak to your IT representative and make sure that these IP addresses are whitelisted:
- 18.210.43.224
- 18.213.58.134
- 52.72.169.63
Once they are you should be able to verify, but if you still have issues, reach out to us in the chat below.